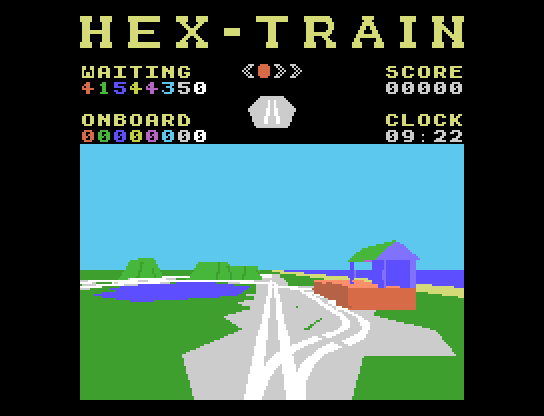
Ever wanted to be a train-driver. Now is your chance.
Introduction
Back at Memofest 2015 I made the bold and mysterious claim that at Memofest 2016 I would unveil a game that was quite unlike any existing Memotech game. This game has animated 3D solid graphics at 192x128, in 15 colours, at 16 frames per second, ... which of course is quite impossible. We could never have made a game like this back in 1985, even if fast disk storage had been available. How this game is possible at all is quite a story in itself, but before we get into that, lets start with the fun part...
Videos on gameplay and the internals are on YouTube.
Drive your toy train around the hexagonal train set. Control your speed and change the points ahead to avoid losing points, or worse, derailing.
Pick up passengers from the stations and score by taking them to their destination stations.
How many passengers can you deliver safely to their desired stations
before the working day ends at 17:00.
Running it
The downloadable package includes all the source code, debugging material, and the game itself.
The game uses a CP/M HTxx.COM executable program.
This is included in a CP/M disk partition called sddisc.bin.
There is also a very large ht.bin data file,
which must be written in raw mode to a large and fast storage device.
This section assumes you are in the runtime subdirectory.
MEMU is a Memotech Emulator. It includes support for emulating Silicon Disc.
You use the HTSI.COM
(HexTrain for Silicon Disc) executable.
Ensure MEMU is on your PATH and run it.
On a Linux system :-
$ export PATH=$PATH:$HOME/mtx/memu
$ ./htsi.sh
On a Windows system :-
path=%path%;c:\memu
htsi.cmd
The ht.bin file is much larger than the largest Silicon Disc
ever could have been (8MB).
But to facilitate testing and running in MEMU, I've extended the Silicon Disc
hardware specification in the most obvious way to support much larger discs.
The latest MEMU supports this extension if -sidisc-huge is
enabled, and and the code in HTSI.COM uses it.
This may mean you need to upgrade MEMU first.
REMEMOTECH is a re-implementation of a Memotech MTX compatible computer. REMEMOrizer is an add-on for the Memotech MTX. Both include an SD Card.
You use the HTSD.COM
(HexTrain for SD Card) executable.
Assuming it's fine to overwrite the SD Card,
copy sidisc.bin to the first SD Card partitition and
copy ht.bin onto the SD Card at 64MB onwards.
On Linux,
assuming your SD Card appears as /dev/sde :-
$ dd if=sddisc.bin         of=/dev/sde bs=8M  seek=0
$ dd if=../compiler/ht.bin of=/dev/sde bs=512 seek=131072
On a Windows system,
assuming you have dd.exe,
and assuming your SD Card appears as
\\?\Device\Harddisk4\Partition0 :-
dd --filter=removable if=sddisc.bin         of=\\?\Device\Harddisk4\Partition0 bs=8M  seek=0
dd --filter=removable if=..\compiler\ht.bin of=\\?\Device\Harddisk4\Partition0 bs=512 seek=131072
Or you can use my Raw I/O
program, which works on Windows 10,
and assuming your SD Card appears as
\\PhysicalDrive3 :-
rawio -d \\PhysicalDrive3 -f sddisc.bin -W
rawio -d \\PhysicalDrive3 -f ..\compiler\ht.bin -o 64MB -W
On the MTX :-
A>HTSD
If anyone has difficulty making the SD Card, send me a blank 512MB-1GB SD Card and I'll prepare and send it back. Alternatively, I might be able to supply one, for a small fee.
CFX includes Compact Flash support.
You use the HTCF.COM
(HexTrain for Compact Flash) executable.
Similar instructions as with REMEMOTECH.
Only the Z80 variant of MTXplus+ is supported.
MTXplus+ includes Compact Flash support.
You use the HTCFPLUS.COM
(HexTrain for Compact Flash on MTXplus+) executable,
instead or the more usual HTCF.COM executable.
This will have been created by building the runtime code with
make MTXPLUS=1.
You use the htplus.bin file instead of the more usual
ht.bin file.
This will have been created by building the compiler code with
make MTXPLUS=1.
Quite a few changes to the game code and data had to be made in order
for HexTrain to work with the V9958, which is why different files are needed.
A fuller explanation is present here.
Game tips
There are no lives - you derail and the game ends. Also, once you start to derail, there is no stopping and reversing out of it.
Avoid going through points round corners fast, you'll be penalised. Going through straight points fast is ok.
You use the Left, Home and Right keys to select the next points setting that will take you left, ahead or right. But bear in mind that more than one setting could take you in a given direction, and all but one setting causes loss of points or derailing. Watch out for derail warning symbol, and select the points again to make it go away.
For example, consider points in the "straight" setting and you come in from the side. You'll turn as you go through the points, and as you get to the join point the wheels of the train will hit the straight rail across their path, derailing.
You get points for delivering passengers to the station they want to go to, but before you pick them up, you have no idea where that will be. But take comfort from the fact passengers that are taken between stations that are further apart are worth correspondingly more.
Avoid reversing. Its slow and do it too much and you will be penalised.
When starting a new game you pick it's filename.
You can pick from existing .HTS files, and some suggested new
names.
If your preferred choice isn't there, pick one that is and rename the file
later.
You can only pick from the first 15 saved files, and which you get depends
on the order CP/M lists them in the directory.
Games that have been saved mid-game can be resumed.
Games that are not started, or are finished (either because the game
finished, or you derailed the train or hit the buffers) can't be.
You can always start (and thus overwrite) a game.
Reported scores
| Player | Gamename | Outcome | Score | Time | When | Notes |
|---|---|---|---|---|---|---|
| Andy | ANDY | Derailed | 1582 | 12:34 | 2016-10-16 | |
| Martin | GAME1 | Finished | 2893 | 17:00 | 2017-10-01 | On MTXplus+ |
Let me know your score (and ideally send your end-of-game
.HTS file) to get on the hall-of-fame above.
Why hexagonal?
If you've played with wooden train sets such as BRIO, you will probably have encountered cases where the pieces don't quite fit together. This comes about from Pythagoras rule: the straight pieces are integer lengths and with right-angled triangles you soon end up needing pieces that are irrational lengths long.
With hexagonal tiles, all angles are 60° or 120°, and everything tessellates perfectly.
In the internal model of the train set, (p,q) coordinates are used, according to this picture :-
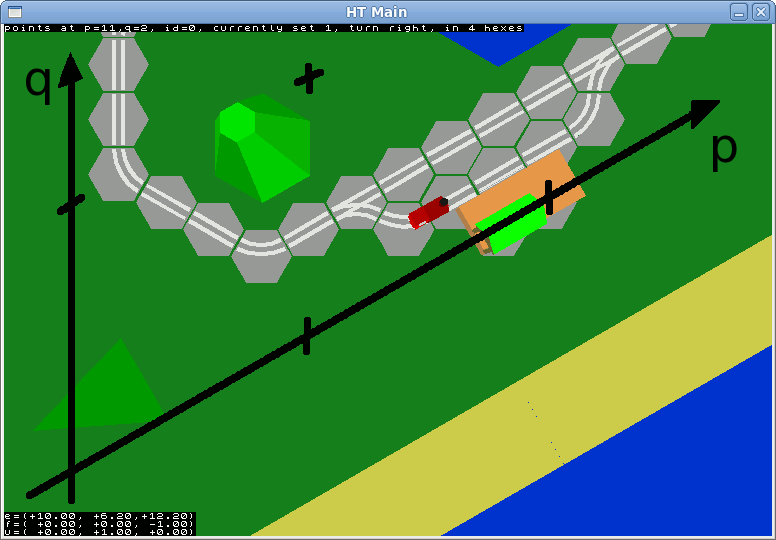
The marks on the p and q axes correspond to p=5, p=10 and q=5, and the station with the green roof exists at coordinate (p=9,q=0).
The 6 directions of travel are known as HexDir_A to HexDir_F in the code, and these can be expressed as these (p,q) vectors :-
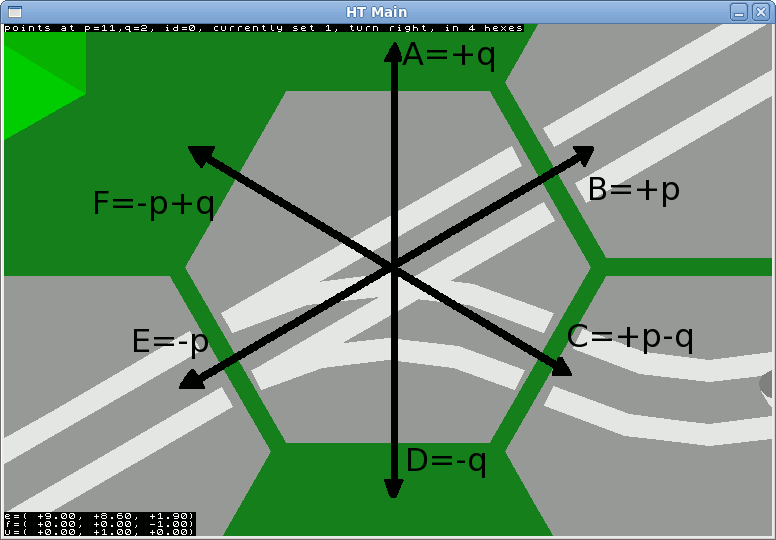
From the diagram it should be clear that to travel one unit in the HexDir_B direction, I must add 1 to the p coordinate.
As you can see I have found a way to map a hexagonal grid to a normal 2D array, although I've had to use squished coordinates to do it.
The train model doesn't just know what pieces are where, it also knows what happens to a train entering in a given direction. In the picture above, if the train enters the points hexagon travelling straight in the HexDir_B direction, and the points are set in the "turn" setting (as opposed to "straight"), the train will turn to the HexDir_C direction, and exit onto the tile with the track that curves left. In this way I am able to put a virtual train on the track and observe where it goes.
The whole map looks like this :-
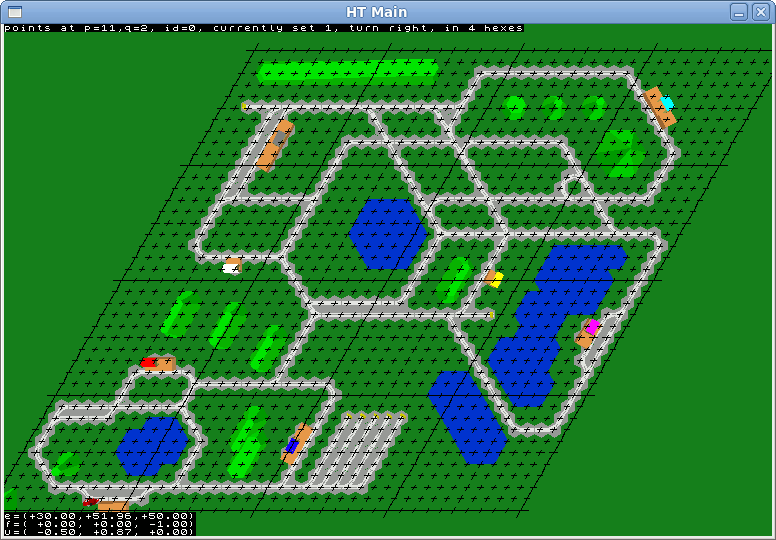
Although when modelling, the pieces of the train set exist at specific
(p,q) coordinates, these are obviously mapped to (x,y) and combined with z
to make normal 3D (x,y,z) coordinates for rendering.
How it works
The main trick
Clearly it's impossible for a 4MHz Z80 system to render animated 3D solid graphics in real-time. However, it is possible to render up graphics in advance, and then to read and copy to the screen in real-time.
Note that this means rendering every possible screen that the user could ever see, in advance. This would be impossible for a car racing or flight simulator style of game, because the user can drive the car or fly the plane anywhere. However, with a train based game, the train can only be on the track. This is why this is a train based game.
The game is more like the "Dragons Lair" game of the 1980's which plays back film sequences from laser-disc, based upon user input.
This is why the game says "Filmed in EXEVIDEOTM" when it starts.
Of course, despite this trick, there are still challenges with
efficient video playback, which are described and addressed below...
Drawing the frames
I built a model of the hexagon pieces and the train set as a whole as a set
of C++ classes, in the files pieces.h and pieces.C.
I use my Modular Renderer library (and the Generalised Bitmap Module bitmap I/O library) to produce views of the train set.
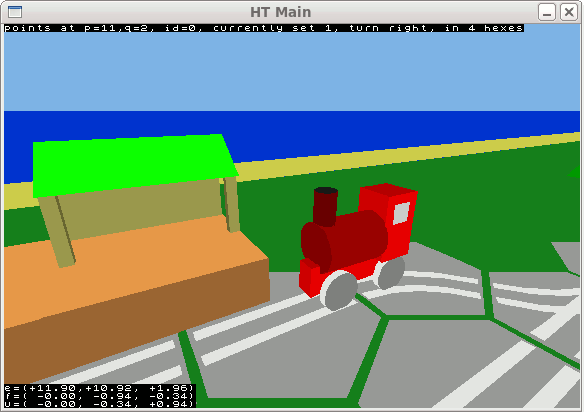
You can interactively explore the train set using the
explore program, whose main window shows a simple
polygon rendered view (like the pictures in the
Why hexagonal explanation
above) and the view might look like this :-
explore can also produce wire-framed output, but this looks
pretty poor, so is not shown here.
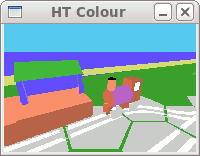
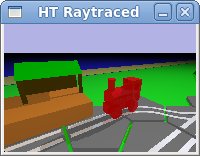
It can produce these pictures :-
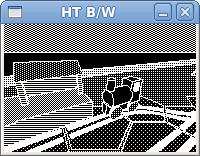
The "B/W" window shows the quality I originally thought was going to be possible, before I dreamt up the special video compression scheme.
The "Colour" window shows the picture reduced to MTX VDP quality, ie: 15 colours, with no more than two colours per 8x1 area. This gives a clear indication of what the user will actually see in the game.
It is possible for two polygons of the same colour to be appear in the picture next to each other, so the mapping to "B/W" and "Colour" images looks for that and can turn the adjoining edges a different colour. In the "B/W" picture, these edges ares shown in white (which is why you can make out the shape of the trains boiler), and in the "Colour" picture two sides of a green mountain would have an edge which is a different shade of green.
The "Raytraced" window shows the same thing raytraced. This is very slow and is only redrawn when the user requests it. Although this has the potential to be really flash, with features such as surface properties, reflection, refraction, anti-aliasing etc.., the result can't be reduced nicely to something to put on a VDP screen.
The explore program can be compiled with or without support
for the "B/W" and/or "Raytraced" windows.
The keys that can be used when the "Main" window has focus are :-
If the train is moving and it derails, it restarts from the start point.
I can use the explore program to build the track layout
and to find keyframe positions for the various fly-by animations.
The track itself is broken up into fragments called "paths". Each path is either a (potentially quite long) sequence of hexagonal train tiles with no points on them, or a sequence of exactly one hexagonal train tile with points on it.
The compile program walks every path and creates frames for
every position along the path the train can be.
Each frame is a 192x128 image in 15 colours, but some pixels have to be
adjusted due to the fact there can only be two colours in any 8x1 pixel block.
The first frame of every path will become a part of the output file.
The compiler also computes differences between successive sets of frames, in a special way (explained later). These deltas also become a part of the output file.
The resulting output file ht.bin contains :-
The path information blocks contain information about that path, including the first delta(s) to apply, and also information about what comes next after the path. This is explained more in the Linkages between paths and deltas section below.
The deltas also contain more than just image deltas. They contain information about the next delta(s) going forwards and backwards.
If you run the compiler, you'll see it render all the frames and
calculate all the deltas, producing the ht.bin file.
This can take 7 minutes, and will produce a file approximately 200MB in size,
containing over 300 paths, a similar number of frames, and over 66000
compressed deltas.
Reading the game data
There are routines to do block level I/O to Silicon Disc, SD Card and CF Disc devices. As these bypass CP/M, they can access data beyond where the CP/M partitions sit (and break the 8MB or 8x8MB barrier). They can also read multiple blocks/sectors in a single read (avoiding the setup time between blocks). In addition, because we read complete 512 byte SD Card and CF Disc blocks, we avoid the "de-blocking" memory copy.
This code was inspired and lifted from the
NARA
experiment that I did just before
Memofest 2015.
This is what gave me the confidence to claim I could show something new.
EXEVIDEOTM compression
In the code, EXEVIDEOTM compressed video is generated and
temporarily stored in .zvd files, which stands for
"Z80-VDP-Delta".
After compilation, this data is strung together as a sequence of deltas,
and stored in the ht.bin file.
The NARA prototype taught me some things :-
The limiting factor is clearly the amount of data we can copy to the screen before the electron gun catches up. The amount of video data read from disk is less of a concern, as we can read this over multiple frame periods.
I acheive a higher resolution than the NARA prototype, and in colour, and this is partially acheived by only updating differences from one frame to the next. If I tried to use uncompressed full video updates, I would be trying to update 3072 bytes of pattern generator and 3072 bytes of pattern colour table each time, which is over twice as much than is possible.
The other main innovation is in the construction of the compressor that works out the differences between two frames.
It writes out an executable program, which when run, transforms a VDP screen showing the first frame into a VDP screen showning the second. This is why the compression scheme is called "EXEVIDEOTM".
Its goal is to produce the quickest update, not necessarily the smallest representation of the update. The generated code is bigger than the bytes being updated, and thats fine. Optimising for time is the primary goal, and space the secondary goal. EXEVIDEOTM is primarily an execution time compressor.
As it generates code, it avoids generating code to update screen areas that are unchanged.
As the code is generated, it tracks the values of certain registers, so it is able to reference those values rather than load new literal constants. eg: imagine we wanted to generate :-
LD A,044H ; 7T, 2 bytes
and we knew that at this point, A was 022H, it would instead generate :-
ADD A,A ; 4T, 1 byte
It knows many ways to make literal values, given the many ways the existing
A registers current value may be related to the desired value, and the
values of the D and E registers.
eg: if the current value was 053H and you wanted 051H, because it knows that
D is currently 2, it would use SUB D.
It would only fall back on the expensive LD A,n as a last resort.
As it generates the code, it knows how many T cycles any code it has generated previously add up to. So it's able to decide to generate fast or slow updates to the VDP (although of course, the aim is for them all to be fast). It also knows how close the electron gun is to catching up, and will complain if it ever does (as this would imply tearing).
I modified MEMU so that I could double check that the cycle times I calculate actually correspond to the cycle times taken during execution.
Notice that the video playback area of the screen is at the bottom and the infrequently changing title, score and information area is at the top. In many games it's more normal to put the active area at the top, but this way gives me additional time to do the update before the electron gun catches up with the video playback area. Every little counts.
When generating slow updates to the VDP, it knows how many T cycles of padding it has added and how many opcode bytes to do it. If it needs to generate non-I/O related code afterwards, it can eat into the padding code producing less padding and the subsequent code (now either free or almost free). To do this, the code generator is able to generate paddings of many numbers of T cycles, from 4T to 21T. eg: consider that we had previously generated :-
        OUT (1),A   ; 11T
        PUSH BC     ; 11T, 1 byte [part of 21T pad]
        POP BC      ; 10T, 1 byte [part of 21T pad]
                    ; next output would therefore be 32T after the first
and we now wished to generate :-
LD A,D ; 4T, 1 byte
the resulting code would be :-
        OUT (1),A   ; 11T
        LD A,D      ;  4T 1 byte
        INC IX      ; 10T 2 byte [part of 17T pad]
        CP (HL)     ;  7T 1 byte [part of 17T pad]
The LD A,D is effectively completely free.
Note also that the LD A,D still comes before the padding, so
the next instruction might also be able to eat into the padding that remains.
Observe that the opcode byte count is now worse, which happens occasionally, but remember we are compressing VDP update time as highest priority, with disk storage space as second priority. Usually opcode byte counts stay the same or decrease.
In each of the bottom 2/3rd of the screen (where the video appears) there are 16 characters defined (0F0H..0FFH) which are solid colours (ie: all pixels are the one colour).
There is a canonical representation of each frame. In this representation, all the pattern name table entries are correct, the pattern generator is fully correct and so is the pattern colour table. But consider these facts :-
Clearly the screen would look identical, although the VRAM doesn't contain the canonical representation of the frame.
The generated code is designed to transform the first frame so that it looks the same as, but is not canonically identical to the second frame, as quickly as possible. Having done this, it then updates the VRAM so that it is canonically identical to the second frame. It doesn't matter if the electron gun catches up whilst the second part of the update is done as nothing changes visually on the screen as a result.
Why bother to make the screen canonically correct at all? Well, any further deltas that are applied require this.
The generated code is relocatable.
Linkages between paths and deltas
Consider a section of the train set in which two paths end up reaching a common path, which after a while hits points and there are two possible paths going forwards.
In this diagram, the paths are in square boxes, and the circles represent the steps or distances the train can be along each path. The first circle in each path is marked solid. To keep things simple, the paths have very few steps along them, although in reality they can be large multiples of 16 steps long.
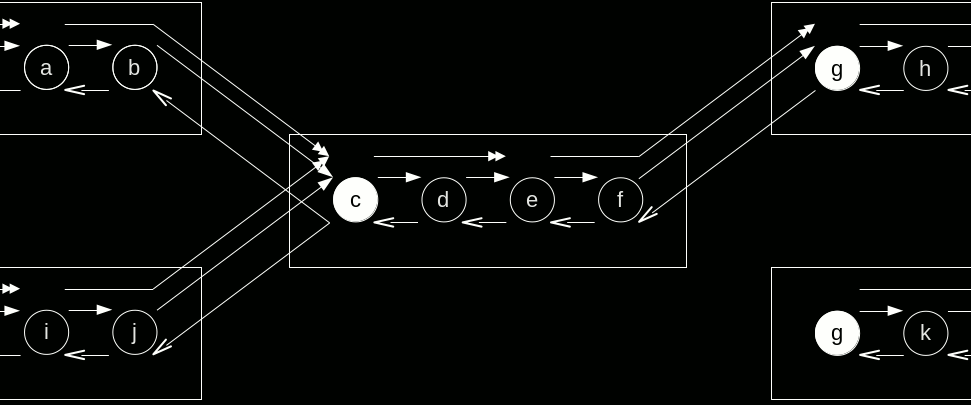
For the solid circles (ie: first position on each path) a full
uncompressed video frame is stored in ht.bin.
The hollow circles are not stored anywhere.
Because of this, the video playback mechanism is able to start playing back
from the start of any path.
You may notice that if you save the game half way along a path, when you
resume it, you'll restart from the start of that path - this is why.
The arrows represent the deltas between video pictures.
These are the auto-generated EXEVIDEOTM code fragments,
and they are also stored in ht.bin.
Each path knows the location of the two deltas from it's first frame, and in addition, the location of the backwards delta taking you to the last frame in the path. ie: in the picture, the central path knows the location of the c->d delta, the c->e delta and the g->f backwards delta This backwards delta is considered to be owned by the path it points into, not where it comes from.
Every delta includes the EXEVIDEOTM code, and also knows the locations of the deltas to apply from this point onwards. eg: the c->d delta includes location of the d->e delta and also the location of the d->c backwards delta. Note that in this case there is no "double forwards" delta from d->f.
Some deltas don't store the locations of subsequent deltas, because they are at the start or end of a path. eg: the f->g delta only stores the location of the g->f reverse delta, not any forward ones to h, k etc.. The code knows it's got to the end of the path, selects the new path and uses the information in the path to find the first delta.
A similar process works in reverse. eg: to go backwards from c, we must find the previous path and find the backwards delta. eg: pick the top left path, and start with the c->b delta. Note that the game remembers which paths you've travelled through so it knows where to go back to, but there is a limit to this, which stops you reversing more than a certain number of paths. This is why if you keep reversing, eventually the train stops.
The train can move "ahead slow", "ahead fast" and "backwards slow". This is acheived by following the deltas of the corresponding types. Note that switching between "ahead slow" and "ahead fast" only happens at an even step position, such as a, c, e, g, or i.
Also note that the deltas between paths on the right only connect to
the top right path.
This isn't quite true.
Observe that the path on the bottom right also starts with exactly the same
initial frame, frame g.
So in effect the f->g delta actually points to both new paths, and
the g->f reverse deltas point back from both new paths to the central
path.
The compiler does redundantly store g twice in ht.bin though.
The locations of the deltas are stored in a 5 byte block called a "CHUNK" which has the logical block address where it can be found and the block count to load. The LBAs and count are in 512 byte block units. NULL is indicated by a count of 0xff (and as it happens the LBA is also stored as 0xffffffff).
Most of the paths are paths in the sense the train can travel along them.
However, in addition to these, there are some which are referred to as
"fly-bys".
In these, the train is moving, but the viewpoint is completely independant.
They only include deltas that go one step forward, so can't be
sped up or rewound.
These are basically just animations used to show off the 3D graphics in
the game.
In the game, the camera is always on the front of the train, is pointing
straight ahead, and unless you derail, is upright - the fly-by animations
can get more creative, and show tilting and rotations.
From time to time you'll see one of these rather than a train journey
in the demo sequence.
Although in the compiler Paths and FlyBys have different classes,
they're compiled to the same basic HT_PATH datastructure.
So the runtime code plays back one of these fly-by videos using the
same logic as it uses to play back videos of the train travelling
along a path.
Video playback
The above datastructure is what the compiler produces and is what allows the runtime code to efficiently do multi-block reads of deltas and thus stream the video.
The MTX code loads the delta from the disk, and then executes it.
The delta includes the count of T cycles it needed to execute,
so we remember that in a variable called t_clock.
It also includes the block address and number of blocks of the next delta.
So when we read it, we add the estimated time to read that many blocks to
t_clock.
Its approximated as 32T/byte, although in practice, it'll be more due
to setup times.
For CFX, it is now approximated as 64T/byte, as the code I have for this
is less optimized.
We know that we want a new frame on the screen no more frequently than
every third frame, so for as long as t_clock is less than
3*80000T, we delay one frame and add 80000T.
This ensures that the playback rate is more or less stable, regardless of
whether each frame differs from the previous one by a large or small
amount.
As there are 50 frames per second (PAL), this gives 50/3 = ~16 frames per second.
When playing back a video, the above is all there is going on.
But during gameplay, there is game logic executing every loop as well.
This can affect the timing mechanism used to keep the playback rate
more or less constant.
However, the game logic is probably only a 1000T or so, and compared to the
total frame time of 80000T, so far seems to be insignificant.
Sound
The game doesn't have many sound effects, but its important that the ones it does have are recognisable. So I downloaded some samples and used Audacity to visualize them.
The chuff or chug noise the train makes has the following envelope and frequency spectrum :-
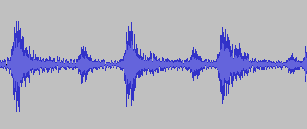
Its easy to see that it is a mix of all frequences with no particular specific dominant frequencies, other than to say there is a bias towards lower frequencies. So you'd stand no chance of synthesizing this from the 3 tone channels. However, white noise is a pretty even blend of all frequencies, so I use this.
The envelope clearly shows a chugging pattern, and it turns out that by getting this right, a chugging sound is clearly recognisable. I use a pattern of 4, where the first one is louder, to get that distinctive "CHUG chug chug chug, CHUG, chug, ...".
For fast speed ahead, I use a higher frequency of white noise, and the chugging "bursts" last for shorter periods of time.
For reverse, I subtly change the envelope to muffle it a little, by reducing the volume for parts of each "chug".
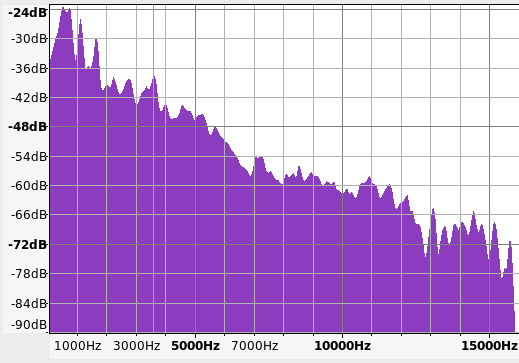
The second important noise is the whistle or bell sound when the train approaches the station. Audacity shows this envelope and frequency spectrum :-
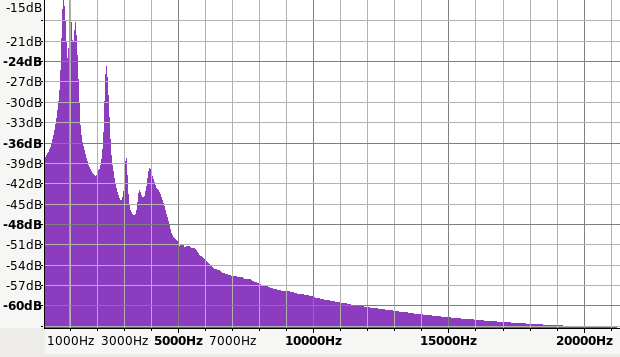
The envelope is relatively easy to copy, but the frequency distribution is difficult. I simply take 3 of the largest frequency peaks (870Hz, 2422Hz and 3936Hz) and program the tone generators with them. Their volumes are then set from the envelope, but in the ratio of the peak sizes. The result is recognisable as a kind of a bell like noise. Not perfect, but its about as good as I am going to get.
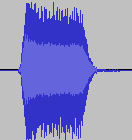
Various other sounds are simpler. Just sweeps of tone or volume or both.
Because of the extreme timing demands of the video, I don't use interrupt
based sound playback.
Instead, every third frame (or thereabouts) I update the volume and
frequency of the current chug noise and current sound effect.
Other considerations
HexTrain aims to pace itself to displaying a new video frame every 3rd VDP frame.
It seems to do a reasonable job of this running in MEMU and on a real MTX.
Although normally set to 4.166MHz for compatibility reasons, REMEMOTECH can run at various speeds, upto 25MHz. When HexTrain starts up, it therefore counts how many CPU cycles there are from frame to frame. REMEMOTECH can also run at 60Hz screen refresh (and usually does, as this is what most VGA monitors need). Running REMEMOTECH at 60Hz screen refresh, or at slower than 4MHz, runs the risk that we will still be outputting to the VDP in fast mode when the screen starts to be redrawn again. Ordinarily this would cause data loss and screen corruption, but REMEMOTECH doesn't require the 8us (typically 32T at 4MHz) gap between each byte sent.
We tried running the original HexTrain on MTXplus+ at
Memofest 2016,
but the results weren't pretty.
The problem and its solution are discussed here.
The solution required changes in the content of the big game data file,
and changes in the runtime executable.
General
The main program is written in C, and compiled using SDCC.
Certain parts, such as those for video, sound, CP/M disk I/O, Silicon Disc,
SD Card, Compact Flash, the random number generator and the C runtime startup
are written in assembler, using the SDASZ80 supplied with SDCC.
Development and testing assets
Andys Binary Folding Editor (aka BE) is a tool that can be used to analyse binary (ie: non-textual) data in files or other places.
The large ht.bin game data file is a complicated beast.
This should be obvious, given the description of the
linkages between paths and deltas, above.
As well as appearing on disk, some of the data from it (the header, path information blocks, frames and deltas) are loaded into memory as the game runs. So there is a BE initialisation file which describes these datastructures.
There is a BE initialisation file htfile.ini that uses the
above and can be used to navigate over the entire ht.bin file.
This can be used as follows :-
$ be -i htfile.ini ../compiler/ht.bin
The game state can be saved and restored. This datastructure appears in saved game files, and also in the memory of the running game. So there is a BE initialisation file which describes the game state data.
There is a BE initialisation file htsave.ini that uses the
above and can be used to peek inside a .HTS saved game file.
Using such a tool to increase your score is of course totally unethical,
but handy for testing purposes.
This can be used as follows :-
$ be -i htsave.ini SOMEGAME.HTS
MEMU has various diagnostic features that are really useful for debugging. These include tracing features and the ability to view code, data and VRAM.
One really powerful feature is the integration with BE via BEMEMU. You can run MEMU so that it listens for a connection from BEMEMU :-
memu -s -v -mc -sidisc-huge -sidisc-no-save -sidisc-file 0 ../compiler/ht.bin -be TOKEN htsi.com
You then run BE so that it uses BEMEMU to read/write data in MEMU :-
be -A16 -Cz80 -vA -Ynoi -yhtsi.noi -i ht.ini memu!TOKEN,0x80
The ht.ini BE initialisation file uses the other files above,
and also knows the names and locations of the global variables within the
running executable program.
BE has recently been enhanced so that it understands the NoICE symbol
format generated by the SDCC toolchain, which is how it knows where in
memory the variables are.
This is the explains the -Ynoi -yhtsi.noi arguments.
BEZ80 is the plugin
to BE that allows it to disassemble Z80 code, which is enabled via the
-Cz80 argument.
Revision history
| Date | Comments |
|---|---|
| 2016-10-29 | Initial version shown at Memofest 2016. |
| 2017-05-20 | Compiler changed to prevent it violating timing constraints
occasionally, and ht.bin regenerated.
Runtime changed to add debug feature causing it to playback every video sequence, so as to verify the above. |
| 2017-10-14 | 7.112MHz Z80 MTXplus+ variant shown at Memofest 2017. |
HEXTRAIN can be downloaded from
http://www.nyangau.org/hextrain/hextrain.zip.
Copying of this program is encouraged, as it is fully public domain. Full source code is included in the package. It was created on the authors time and equipment. Caveat Emptor.
Now that I've written a semi-decent 3D graphics game, perhaps I'll stop getting flak for the not-so-decent "3D Turbo" game I wrote 30 years ago.
The author of HEXTRAIN and this documentation is Andy Key
(email andy.z.key@googlemail.com).
{{{ Andy